


Replacing a lawn mower blade is a routine maintenance task that most homeowners across the UK and Europe can carry out themselves.With the correct tools and proper safety precautions, the job typically takes no more than 30 minutes.
Whether you’re using a petrol mower, a cordless battery model, a ride-on mower, or a robotic lawn mower, preparation is essential. Taking a few minutes to set up properly will help you avoid damaged bolts, fuel spills, or accidental starts. Let’s begin with the fundamentals.
Part 1. The Pre-Replacement Checklist: Tools & Safety
Before turning the mower on its side, it’s important to ensure you have the correct tools and that the machine is completely isolated from its power source. Skipping these steps is where most problems arise.
1. Tools You’ll Need
Most households in the UK will already have these items in the shed or garage.
Essential Tools
- Socket set or spanner set (commonly 13mm, 14mm, 16mm or 17mm depending on model)
- Breaker bar (helpful for tight or seized bolts)
- Heavy-duty gardening gloves
- A sturdy wooden block (to prevent blade rotation)
- Replacement blade (specific to your mower model)
- Clean cloth or rag
-
Penetrating oil (for corroded bolts)
Recommended (Optional but Sensible)
- Torque wrench (for correct tightening, typically 40–60 Nm for most domestic mowers — always check manufacturer guidance)
- Safety glasses
- Anti-seize compound
- Wire brush (to clean mounting surface)
2. Safety Precautions (Do Not Skip)
Before placing your hands anywhere near the cutting deck, the mower must be fully powered down and isolated. Procedures vary slightly depending on mower type.
Universal Safety Guidance
- Work on a flat, stable surface.
- Engage the parking brake on ride-on mowers.
- Block wheels to prevent movement.
- Use a wooden block to secure the blade before loosening the bolt.
- Keep children and pets well away.
-
Never place hands beneath the deck without securing the blade first.
A Practical Tip Before You Flip the Mower
Before turning the mower over:
- Clear away grass build-up with a stick or brush.
- Take a photo of the blade’s orientation.
- Note which side faces downward.
It is surprisingly common to reinstall the blade upside down, which results in poor cutting performance.
Common Mistakes to Avoid
- Forgetting to disconnect the spark plug
- Tilting the mower on the wrong side
- Using the incorrect socket size (rounding the bolt head)
- Not securing the blade before loosening
- Overtightening beyond manufacturer torque specification
Safety Caution on Different Mowers
For Petrol Lawn Mowers
- Switch the mower off completely.
- Allow the engine to cool fully (at least 15–20 minutes).
- Disconnect the spark plug lead and move it aside.
- If possible, run the mower until the fuel level is low.
- Turn off the fuel tap (if fitted).
Always tilt the mower with the air filter facing upwards.
Tilting it the wrong way may cause oil or petrol to leak into the carburettor or air filter housing.
For Cordless / Battery Mowers
- Power off the machine.
- Remove the battery pack completely.
- Press the start button once after removal to discharge any residual current.
- Store the battery away from the work area.
- Never rely on simply switching the mower off — always remove the battery.
For Electric (Corded) Mowers
- Switch off at the mains.
- Unplug the extension lead completely.
- Keep the cable well clear of the work area.
For Robotic Lawn Mowers
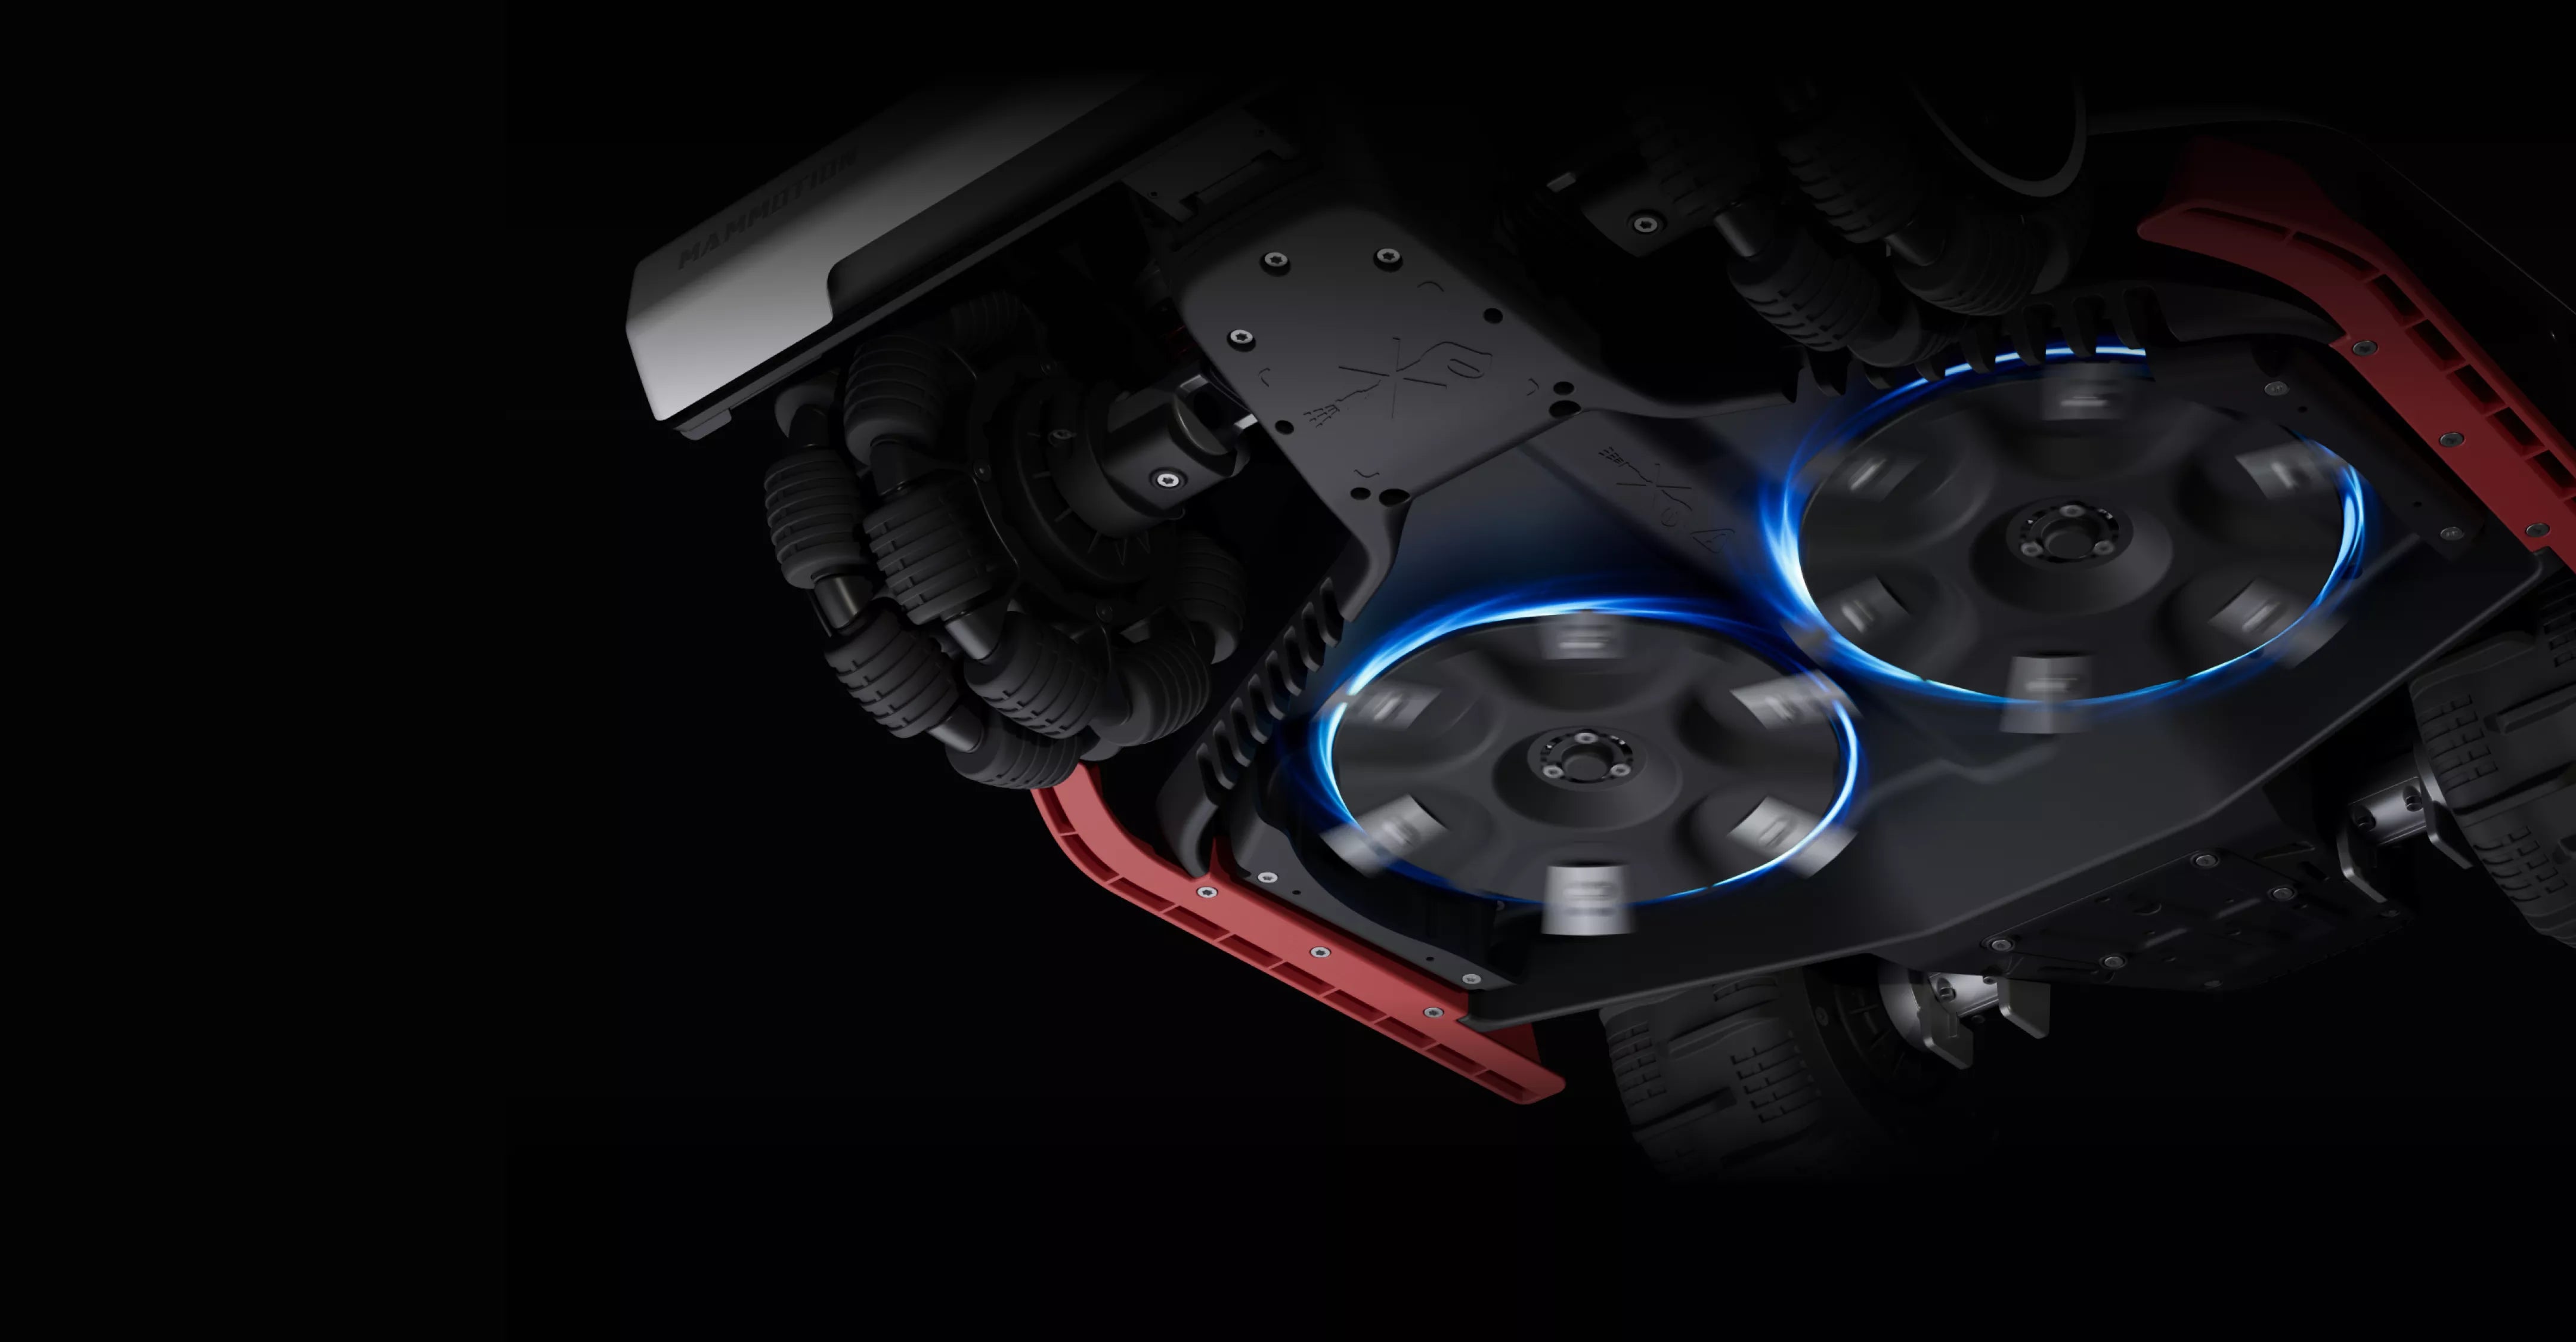
- Power down the unit via the control panel.
- Remove the safety key (if applicable).
- Wait until all blade movement has completely stopped.
- Remove the battery if the model allows.
When you change robotic mower blades like the Mammotion robot lawn mower brand, wearing gloves is essential as they are smaller but extremely sharp.
3. Confirming You Have the Correct Blade
Before proceeding, double-check:
- Your mower’s model number (usually located near the deck or engine housing).
- Blade length (measured tip to tip).
- Centre hole fitting type (round, star-shaped, multi-point).
- Blade width and thickness.
Using an incorrect blade can cause vibration, uneven cutting, or long-term strain on the motor. If in doubt, consult the manufacturer’s website or authorised dealer.
Part 2. Step-by-Step Guide: How to Replace Your Mower Blade Like a Pro
Follow these steps carefully and you’ll complete the job safely and correctly the first time.
Step 1: Turn Off and Disconnect Power
Before doing anything underneath the deck, fully isolate the machine.
- Petrol mowers: Switch off the engine, let it cool, and disconnect the spark plug. Turn off the fuel tap if fitted.
- Cordless mowers: Remove the battery and press the power button once to discharge any residual current.
- Corded electric mowers: Unplug from the mains and keep the cable clear of the work area.
- Robotic mowers: Power off, remove the safety key if applicable, and ensure the blade has fully stopped.
Do not rely on the switch alone. Physical disconnection is essential.
Step 2: Tilt the Mower Correctly
Position the mower on a flat surface before tilting.
Petrol models:
Always tilt the mower with the air filter and carburettor facing upwards.
This prevents:
- Oil entering the air filter
- Fuel leakage
-
Hard starting issues afterwards
If unsure which side houses the air filter, check the engine casing before lifting.
Battery and electric mowers:
Either side is usually acceptable, but avoid crushing cables or controls.
Ride-on mowers:
Use ramps or a proper lifting jack. Never rely on unstable blocks.
Step 3: Secure the Blade
Before loosening the bolt, the blade must be immobilised.
- Insert a sturdy wooden block between the blade and the deck housing.
- Ensure the block is tight enough to stop movement.
- Wear heavy-duty gloves at all times.
Do not attempt to hold the blade by hand while loosening the bolt.
Step 4: Loosen the Bolt
Most European domestic mowers use a standard right-hand thread. That means: Turn anti-clockwise to loosen.
Practical technique:
- Use a correctly sized socket (commonly 13mm–17mm).
- Fit it securely to avoid rounding the bolt head.
- Apply steady pressure.
- If tight, use a breaker bar for additional leverage.
If the bolt is seized:
- Apply penetrating oil.
- Wait 10–15 minutes.
- Tap the bolt head lightly with a hammer to help the oil penetrate.
-
Try again with steady force.
Avoid sudden jerking motions — this can strip threads.
Step 5: Remove the Old Blade
Once the bolt is removed:
- Carefully slide the blade off the spindle.
- Note the orientation before removing fully. Inspect:
- Blade adaptor
- Washer
- Mounting flange
Clean the spindle area using a wire brush or cloth to remove grass build-up and rust. Check for:
- Cracks in blade
- Bending
- Severe wear
-
Damaged mounting hole
If the spindle itself appears bent, do not continue — this requires professional inspection.
Step 6: Install New Blade
Position the new blade exactly as the old one was installed.
Critical point: The cutting edges must face in the direction of rotation.
Most blades are stamped with:
- “Grass side”
- “This side down”
- Or an arrow indicating rotation
If no marking exists:
- The curved or raised edge (lift wing) faces upwards towards the deck.
-
The sharp cutting edge faces forward in the direction of rotation.
Place the blade onto the spindle.
Reinstall washer and bolt in correct order.
Step 7: Tighten to Correct Torque
- Thread the bolt in by hand first to avoid cross-threading.
- Once finger-tight: Use a torque wrench.
Typical torque range (check manual for exact spec):
- Push mowers: 40–60 Nm
- Ride-on mowers: 70–100 Nm
If you do not have a torque wrench:
- Tighten firmly using a standard spanner.
- Do not over-tighten to the point of straining the bolt.
Overtightening can:
- Strip threads
- Warp the blade
- Make future removal extremely difficult
- Remove the wooden block after tightening.
- Rotate blade by hand (carefully with gloves) to confirm smooth movement.
Step 8: Reconnect and Test
Return the mower to upright position.
Reconnect power source:
- Reattach spark plug lead.
- Reinsert battery.
- Plug into mains (if corded).
- Reinsert safety key (robotic).
Move mower to a clear outdoor area.
Start the engine or power on. Observe for:
- Unusual vibration
- Rattling sounds
- Uneven rotation
- Abnormal noise
If vibration occurs:
- Stop immediately.
- Recheck blade seating.
- Confirm correct torque.
-
Ensure blade is not upside down.
Allow the mower to run for 30–60 seconds before cutting grass.
- Professional Finishing Checks
- Before mowing:
- Ensure all tools are removed from deck.
- Confirm bolt is fully tightened.
- Check that blade spins freely without obstruction.
A correctly installed blade should produce:
- Smooth engine sound
- Minimal vibration
- Clean, even cut
Part 3. Is Your Blade Crying for Help? 5 Signs You Need a New One
Lawn mower blades gradually wear down over time. Unlike mechanical faults that appear suddenly, blade damage usually develops slowly and shows visible warning signs.
Regular inspection helps maintain cutting performance and protects the health of your lawn. If you notice any of the following symptoms, your blade may need replacing rather than sharpening.
Sign 1. Grass Tips Look Torn or Frayed
A blunt blade tears grass instead of slicing it. Torn grass struggles to retain moisture and becomes more vulnerable to fungal diseases.
What You’ll Notice
- Grass ends appear ragged instead of cleanly cut
- Tips of grass turn white or brown shortly after mowing
- Lawn surface looks uneven despite correct cutting height
What You Should Do
Inspect the cutting edge closely:
- If the blade is simply dull, sharpening may solve the issue.
-
If the edge is heavily worn or uneven, replacement is recommended.
Sign 2. Increased Vibration While Mowing
Excessive vibration typically indicates that the blade is unbalanced. This can be caused by bending, uneven wear, or damage from striking stones or debris.
What You’ll Notice
- The mower feels rougher or less stable
- Handle vibration is stronger than usual
- You may hear rattling or knocking sounds
What You Should Do
- Stop using the mower immediately and inspect the blade.
- If the blade is bent or unevenly worn, it should be replaced rather than repaired.
Sign 3. Visible Cracks, Bends or Structural Damage
Structural damage weakens the metal and increases the risk of blade failure during operation. A cracked blade can break apart at high speed, posing a serious safety hazard.
What You’ll Notice
- Hairline cracks near the mounting hole
- Chips or splits along the cutting edge
- Blade appears twisted or warped
- Lift wings are visibly distorted
What You Should Do
- Do not attempt to sharpen or reuse a damaged blade.
- Any blade showing cracks, deep chips, or deformation must be replaced immediately.
Sign 4. Blade Has Been Sharpened Multiple Times
Every sharpening removes metal. Over time, the blade becomes structurally weaker and less effective at generating airflow beneath the deck, which is essential for clean cutting.
What You’ll Notice
- Blade looks thinner than when new
- Cutting edge loses sharpness quickly
- Lift wings appear worn down
- Blade balance becomes harder to maintain
What You Should Do
- Compare the blade width and thickness with a new replacement blade.
- If significant metal loss is visible, replacement is the safer and more effective solution.
Sign 5. Declining Cutting Performance
A worn blade loses both sharpness and lift capability. Without proper airflow, grass is not pulled upright before cutting, which reduces mowing efficiency — particularly in moist UK grass conditions.
What You’ll Notice
- Strips of grass remain uncut
- Lawn finish appears patchy or uneven
- Mower struggles in slightly longer grass
-
You need to mow the same area multiple times
What You Should Do
First check:
- Cutting height settings
- Deck cleanliness
- Engine or battery performance
If these factors are correct, the blade is likely worn and should be replaced.
FAQs
1. How often should you replace a lawn mower blade in the UK?
Typically every 1–2 mowing seasons, depending on lawn size and frequency of use.
2. Can I replace a mower blade without disconnecting the spark plug?
No. Always disconnect the spark plug or remove the battery before replacing the blade.
3. Are lawn mower blades universal?
No. Most blades are model-specific and must match length and centre hole type.
4. What size socket removes a mower blade bolt?
Usually 13mm–17mm for UK domestic mowers, depending on the model.
5. Is it better to sharpen or replace a mower blade?
Replace if cracked, bent, or heavily worn; sharpen only if structurally sound.
6. How tight should the blade bolt be?
Typically 40–60 Nm for push mowers; always check manufacturer torque specs.
7. Why does my mower vibrate after blade replacement?
Likely incorrect installation, imbalance, or wrong blade model.
Conclusion
Replacing your lawn mower blade may seem daunting at first, but with the right tools, safety precautions, and a clear step-by-step approach, it’s a task any homeowner can handle. Regular blade maintenance not only keeps your mower running smoothly but also ensures a healthier, cleaner, and more attractive lawn. Take your time, follow the steps carefully, and your mower will reward you with perfectly cut grass season after season


